Introduction
As I have learned, conducting field work is much more about being able to adjust to physical terrain, weather, and technical complications than about being able to use the latest and greatest equipment. As technology has continued to progress, new, more efficient ways have been developed for tasks like surveying. However, all too often, things don't work as planned.At those times being able to conduct something like a tried and true distance azimuth survey can be the difference between going home empty-handed and seeing through a successful mission. This exercise will walk through the steps involved in conducting such a survey and turning it into a communicative map.
A distance azimuth survey is used to establish the position of objects by determining distances and angles from a point of origin. Bearings (azimuths) begin at 0 degrees toward true north and proceed in a clockwise direction to 360 degrees (as seen in Figure 1).

Figure 1: This is a portrayal of the distance-azimuth survey process. By establishing a point of origin (P1) and true north (0 degrees) a distance is measured between two points as well as the bearing (azimuth) between true north and the "line" between the points.
To illustrate this technique, a survey will be conducted identifying approximately 100 points in a defined space. Methods
Survey AreaBecause the parameters of this exercise involved establishing approximately 100 points, it required some pre-survey planning to choose an optimal location. The area surrounding the University of Wisconsin-Eau Claire campus has been opened up with a relative scarcity in free-standing objects for such a project. Building on the work done in the Field Methods class from 2013, the decision was made to conduct the survey in Randall Park (as seen in Figure 2).

Figure 2: Randall Park is blocked out in red in this photo. It was chosen due to its proximity to the University of Wisconsin-Eau Claire (directly across the river) as well the amount of free-standing objects present in the park.
Pre-Planning
Temperatures on February 23, 2014 (the day of the survey) were in the single digits, so anything that could be arranged pre-survey was helpful.
Referring back to the Field Methods 2013 class, one team had surveyed Randall Park by establishing points of origin at all four corners. This seemed like an ideal method, therefore, four sheets were prepared with 25 spaces to enter on each one. A place for point of origin reference, distance (in meters), azimuth (in degrees), and I.D. label to help specify each object later on were listed across the top of each sheet.
Instrumentation
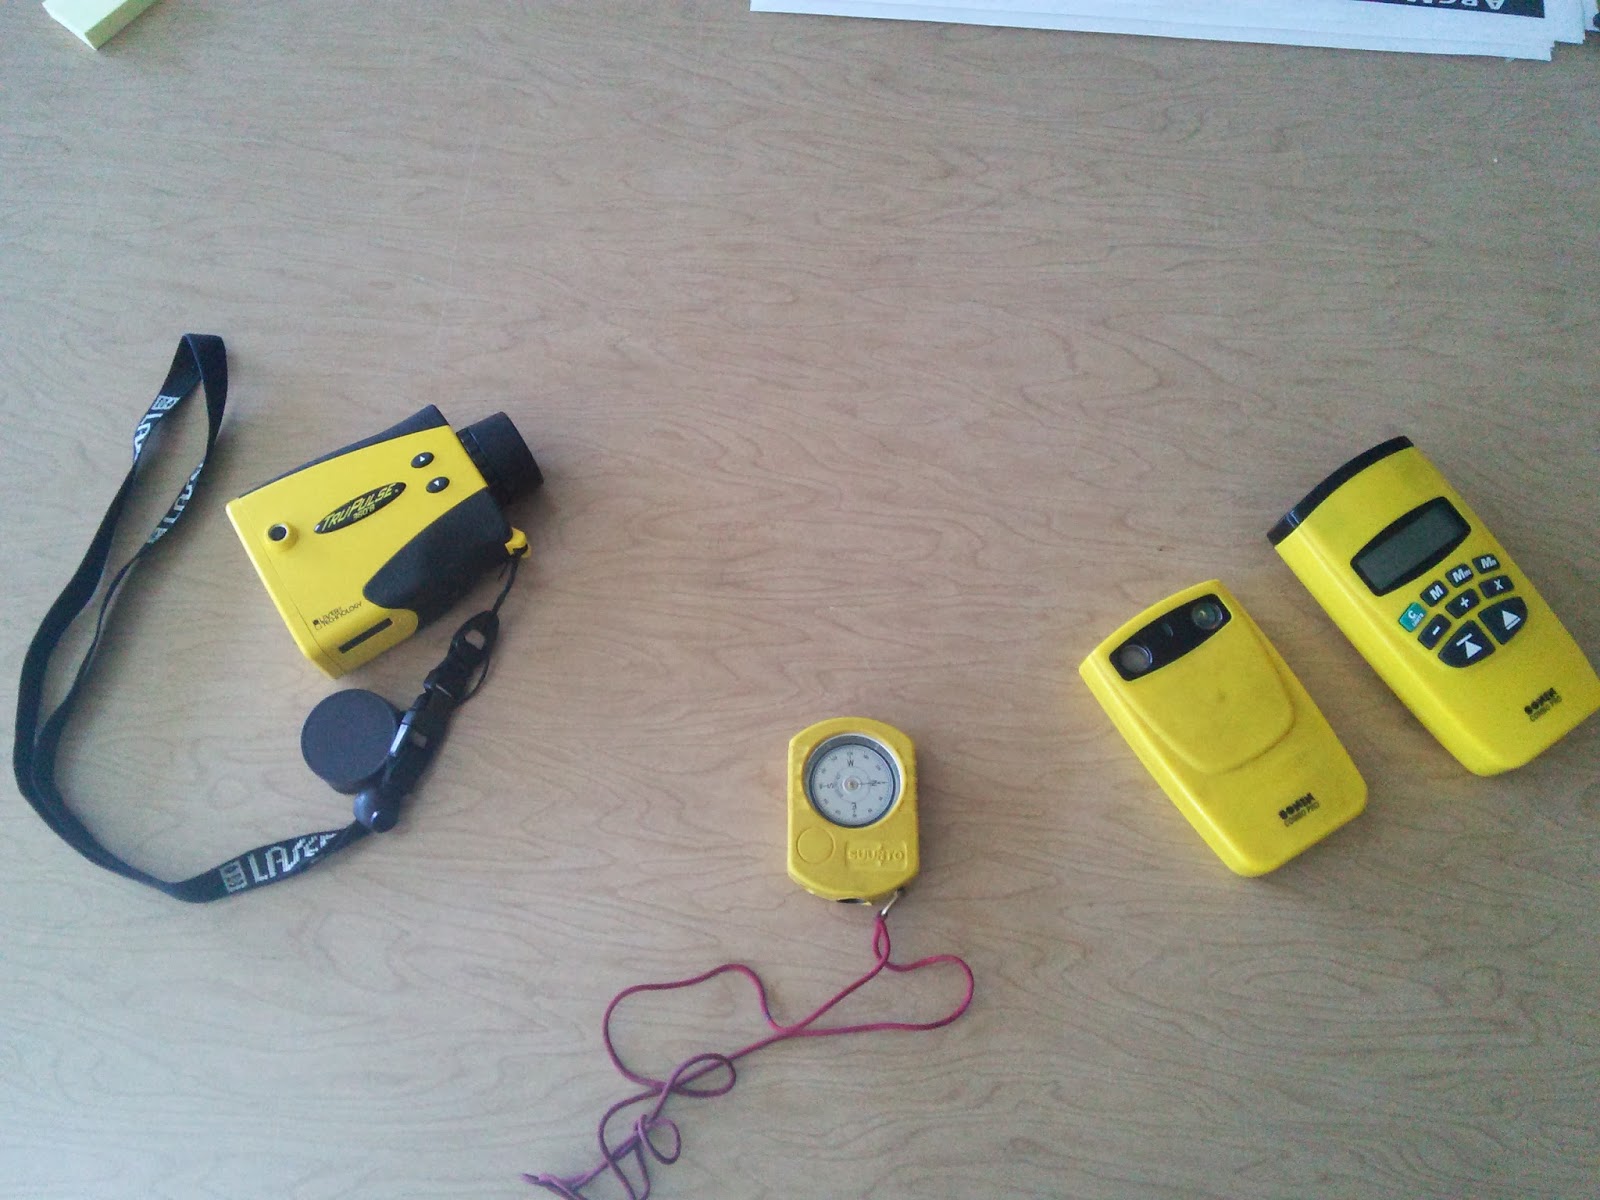
As mentioned in the Introduction, technology has progressed through the years; this applies to distance-azimuth surveying equipment as well. These technologies include a basic compass, a two-part radio range-finder, and a laser range-finder as seen in Figure 3.
The two part radio range-finder includes a receiver and a locator. The receiver is placed at the point of the object being measured while the range-finder is held at the point of origin. Once contact has been established between the two instruments. The locator will project both the distance (in meters) and azimuth (in degrees).
The laser range-finder is a much simpler, though more technologically advanced device. No receiver is needed, and the measurements are projected in a similar manner to the two-part radio range-finder.
 . Figure 4: One member of our team is seen holding the receiver of the two-part radio range-finder. The other member, standing at the established point of origin would establish contact with the receiver using the range-finder to determine distance and azimuth measurements.
Instrumentation
As mentioned in the Introduction, technology has progressed through the years; this applies to distance-azimuth surveying equipment as well. These technologies include a basic compass, a two-part radio range-finder, and a laser range-finder as seen in Figure 3.
The two part radio range-finder includes a receiver and a locator. The receiver is placed at the point of the object being measured while the range-finder is held at the point of origin. Once contact has been established between the two instruments. The locator will project both the distance (in meters) and azimuth (in degrees).
The laser range-finder is a much simpler, though more technologically advanced device. No receiver is needed, and the measurements are projected in a similar manner to the two-part radio range-finder.
Figure 3: From left to right, there is a laser rangefinder, compass, and two-part radio rangefinder. Each of these tools can be used to accomplish a distance azimuth survey.
In order to be prepared, all three of these tools were brought along. The initial plan was to use the two-part radio range-finder. Some complications were realized with this tool (which will be described later) and most of the survey was taken using the laser rangefinder.
Conducting the Survey
As mentioned in Instrumentation, the two part radio rangefinder was selected to conduct the survey. One member of our team would stand at the point of origin and call out distance and azimuth measurements while the other member would place the receiver at the point of every object to be surveyed and record the measurements and identification details (as seen in Figure 4)
Establishing Point of Origin
The first step in actually carrying out the survey is to ascertain the point of origin for the selected location. Keep in mind, more than one point of origin may be used throughout depending on the needs of the survey. However, it is imperative to record the location of each point of origin. If distance and azimuth are not connected with the proper point of origin, any data and later mapping will be completely inaccurate.
The point of origin was established and recorded for the first of our intended four corners. Then, as previously stated, one member of our team "marked" each object with the receiver and recorded results while the other member manned the range-finder and called out distance and azimuth measurements.
Complications with Two-Part Radio Range-Finder
Before we had even finished surveying the first 25 points from the first point of origin, we realized that the two-part radio range-finder would not register any measurements beyond approx. 35 m. However, it was very good at establishing distance through thick foliage.
Switch to Laser Rang-finder
As a result of this complication, the decision was made to switch over to the laser range-finder (as seen in Figure 5). This instrument was capable of recording measurements of objects much further away. This eliminated the need for the data-recorder to also hold an instrument at the point of each object. In order to maintain detailed data, this member, instead, identified objects to be measured to ensure none were measured twice.

Challenges with Laser Range-Finder
While the laser range-finder could record measurements across much longer distances, it had trouble locating very thin objects such as telephone pole wires anchored to the ground. For very thin items it was necessary for the second member of our team to stand at the base of the object and to record the distance and azimuth by "shooting" the laser at the team-member.
In addition, it was less adept at shooting through other foliage, etc. After we had moved on to our second corner point of origin, it became clear we may need more than four points of origin at each corner of the park if we were going to collect approximately 100 points.
Point of Origin Adjustment
Faced with this realization, our initial plan was to establish two additional points on the edges of the park in-between the corners. After thinking this through a little more, a decision was made to shoot from the very center of the park.
This was the break-through decision for this project. Each corner of the park had only a limited path of vision to objects inside the park without obstructed views. By establishing a point of origin in the center of the park, we had opened up a 360 degree viewpoint with access to far more points than could be gathered from any of the four corners.
It became very clear we would not need to establish another point of origin to gather the necessary data. The remaining data points were gathered using the laser range-finder from a point of origin in the center of the park.
Data Entry
As specified, measurements were recorded in the field (as seen in Figure 6).

Data recorded in the field was simply transferred to Excel spreadsheets (as seen in Figure 7) allowing us to send it to ArcMAP to produce a visual of our results.

Transfer to ArCMAP Geodatabase
After building a geodatabase specifically for this data-set in ArcMAP, the Excel Spreadsheets were imported to it. While object I.D.s such as "tree" or "bench" were recorded, the decision was made to omit their inclusion from the final map. It was not clear, with a diverse set of objects, how to appropriately differentiate them on any proceeding map.
To ensure the data was formatted correctly, the data layer containing our data-set was adjusted to the WGS 1984 Geographic Coordinate System due to the formulation of data based on latitude and longitude units. Failing to make this adjustment would have distorted our data presentation on the map. Also, it was necessary to include calculations for the points of origin to 6 decimal places. Just mis-recording information by .1 decimal degrees would translate to a land difference of approximately 8 km. and greatly reduce the accuracy of our map.
Visual consideration was also important. In order for readers to get a sense of the accuracy of our measurements and the area being surveyed an aerial imagery base map was added to the geodatabase.For this kind of a survey without any real focused purpose for selecting survey objects, this was the best way to convey our message.
Distance Bearing to Line Tool in ArcMAP
Continuing to work in ArcMAP, the Distance Bearing to Line tool was selected from ArcToolbox to build lines representing the distance, azimuth, and point of origin data (x and y coordinates) that had been collected and imported.

Feature Vertices to Points Tool
Also found within Arc Toolbox the feature vertices to points tool (as seen in Figure 9) build a point at the end of each line built with the bearing distance to line tool. These points are representative of the "object" measurements were taken of.


The point of origin was established and recorded for the first of our intended four corners. Then, as previously stated, one member of our team "marked" each object with the receiver and recorded results while the other member manned the range-finder and called out distance and azimuth measurements.
Complications with Two-Part Radio Range-Finder
Before we had even finished surveying the first 25 points from the first point of origin, we realized that the two-part radio range-finder would not register any measurements beyond approx. 35 m. However, it was very good at establishing distance through thick foliage.
Switch to Laser Rang-finder
As a result of this complication, the decision was made to switch over to the laser range-finder (as seen in Figure 5). This instrument was capable of recording measurements of objects much further away. This eliminated the need for the data-recorder to also hold an instrument at the point of each object. In order to maintain detailed data, this member, instead, identified objects to be measured to ensure none were measured twice.
Figure 5: In this picture, a team member stands at the corner point of origin in Randall Park using a laser rang-finder to establish distance and azimuth measurements. A switch was necessary due to the limited range of the two-part radio range-finder
Challenges with Laser Range-Finder
While the laser range-finder could record measurements across much longer distances, it had trouble locating very thin objects such as telephone pole wires anchored to the ground. For very thin items it was necessary for the second member of our team to stand at the base of the object and to record the distance and azimuth by "shooting" the laser at the team-member.
In addition, it was less adept at shooting through other foliage, etc. After we had moved on to our second corner point of origin, it became clear we may need more than four points of origin at each corner of the park if we were going to collect approximately 100 points.
Point of Origin Adjustment
Faced with this realization, our initial plan was to establish two additional points on the edges of the park in-between the corners. After thinking this through a little more, a decision was made to shoot from the very center of the park.
This was the break-through decision for this project. Each corner of the park had only a limited path of vision to objects inside the park without obstructed views. By establishing a point of origin in the center of the park, we had opened up a 360 degree viewpoint with access to far more points than could be gathered from any of the four corners.
It became very clear we would not need to establish another point of origin to gather the necessary data. The remaining data points were gathered using the laser range-finder from a point of origin in the center of the park.
Data Entry
As specified, measurements were recorded in the field (as seen in Figure 6).
Figure 6: Distance, Azimuth, and Object ID data were recorded in the field to be placed in spreadsheets upon survey completion.
Data recorded in the field was simply transferred to Excel spreadsheets (as seen in Figure 7) allowing us to send it to ArcMAP to produce a visual of our results.
Figure 7: This figure shows the transfer of data taken in the field to Excel spreadsheets. The X and Y coordinates correspond with the point of origin information which was retrieved from ArcMAP once the information was transferred there.
After building a geodatabase specifically for this data-set in ArcMAP, the Excel Spreadsheets were imported to it. While object I.D.s such as "tree" or "bench" were recorded, the decision was made to omit their inclusion from the final map. It was not clear, with a diverse set of objects, how to appropriately differentiate them on any proceeding map.
To ensure the data was formatted correctly, the data layer containing our data-set was adjusted to the WGS 1984 Geographic Coordinate System due to the formulation of data based on latitude and longitude units. Failing to make this adjustment would have distorted our data presentation on the map. Also, it was necessary to include calculations for the points of origin to 6 decimal places. Just mis-recording information by .1 decimal degrees would translate to a land difference of approximately 8 km. and greatly reduce the accuracy of our map.
Visual consideration was also important. In order for readers to get a sense of the accuracy of our measurements and the area being surveyed an aerial imagery base map was added to the geodatabase.For this kind of a survey without any real focused purpose for selecting survey objects, this was the best way to convey our message.
Distance Bearing to Line Tool in ArcMAP
Continuing to work in ArcMAP, the Distance Bearing to Line tool was selected from ArcToolbox to build lines representing the distance, azimuth, and point of origin data (x and y coordinates) that had been collected and imported.
Figure 8: This figure displays the location of the Bearing Distance to Line tool found within ArcToolbox. This tool builds lines based on distance, azimuth, and reference point data collected in a survey.
Feature Vertices to Points Tool
Also found within Arc Toolbox the feature vertices to points tool (as seen in Figure 9) build a point at the end of each line built with the bearing distance to line tool. These points are representative of the "object" measurements were taken of.
Figure 9: This figure displays the location of the Feature Vertices to Points tool found within ArcToolbox. This tool establishes points at the ends of lines created using the Bearing Distance to Line tool. These points represent the objects measured.
Final Map
After employing these tools a final map needed just a few aesthetic touches before being displayed. In order to show the three different points of origin where data was taken from, the data originating from each point was differentiated by color (as seen in Figure 10). In addition, a title, legend, north arrow, and scale bar were added to help provide some context.
Figure 10: The final map produce in ArcMAP displays the distance/azimuth lines and points generated from our survey. Three colors were used to differentiate between the three different points of origin data was collected from.
Discussion
Field Adjustments
As is often the case with field work, the exercise required adjustment in the field. After collecting some data with the two-part radio range-finder it became evident it was not our best option for data collection. While it was excellent for establishing contact in obstructed areas, such as through foliage, the range of this was simply unsuited to the task at hand.
Switching to the laser range-finder proved to be a wise decision even though it presented other challenges. The additional range we sought was worth making the switch. However, the laser range-finder was not nearly as good at sifting through foliage to make measurements, nor was it capable of identifying very thin items such as light pole wires. This was overcome by using the body of a team-member as the target for the range-finder.
As you can see in Figure 10, the range of measurements for our first two points of origin is rather limited. The yellow points' lack of range was mostly attributed to the two-part radio range-finder and its inability to record a measurement for more than 35 m. The second point of origin, in blue, had more to do with the inability of the laser range-finder to work around obstructions.
What is clearly noticeable is the much wider paths, and longer distances recorded from the middle of the park. Our data collection time was greatly reduced by switching to this location. If the entire park were to be measured and not just 100 points (approximately), I would recommend beginning the survey from a point of origin in the center of the park. In addition, for accuracy, points of origin would need to be established in each of the four corners. This would ensure no features were missed.
ArcMAP Adjustments
It is imperative when setting the x, y coordinates in ArcMAP to record out to 6 decimal places (or more if you so choose). The misrepresentation of data on a map by rounding up or down will lead to a nearly illegible, unusable map.
Also, we had originally included Object I.D. information (in the form of nominal data) to potentially make our map more clear. However, this information impacted where distance-azimuth line features were placed. When they were added, the placement of every line and point was moved to a different location. We are unsure of why this would take place, but either way, the information was omitted as a result.
Map Analyzation
It may not be clear unless you are looking for it, but there are definitely points on our map that do not line up with the points recorded in the field. On the far right of the map (as seen in Figure 10) there are lines going to points in the middle of the street. No data was recorded in these locations, rather they were taken in the boardwalk to the left of the street. It is uncertain why this misrepresentation of the data took place, but there are some possible explanations. First, it could be the result of differentiation between the base map and coordinate system. There could have been shifting over time, though it seems unlikely to be that much. Secondly, in the midst of single-digit temperatures enhanced by sharp winds, it is possible that inaccurate measurements were recorded due to human error. Though we tried to account for any possible items we could possibly need in the field, it would have been ideal to employ a tripod to ensure steadiness while taking measurements.
Conclusion
Distance-Azimuth surveying may be viewed as arcane with amazing tools like global positioning systems at our disposal. Still, having experience with fundamental surveying practices is extremely valuable. Even in the small sample of our survey, we ran into issues where technology was inadequate to record some types of results due to obstruction or distance. When the stakes are higher, the obstructions potentially larger, and the scope exponentially more broad, an infinite number of problems may arise. In order to be efficient in the field, having a repertoire of options is crucial. Simpler methods may not have the frills of newer technologies but by implementing a good strategy and adjusting to conditions, very accurate data can be collected using something like distance-azimuth surveying.
No comments:
Post a Comment